October 16th, 2019: EPN-Finicity Integration Release
Print
Modified on: Thu, 2 Dec, 2021 at 3:51 PM

Finicity Verification & Decisioning Products Now Available in EPN Platform
Product Information and Setup Guide
You can now offer your clients access to a number of new digital decisioning and verification products in EPN: the Finicity Verification of Income and Verification of Assets products. Finicity’s solutions are digital and automated to provide faster, more accurate income and asset verification results for the application and origination process.
Finicity products deliver faster origination results by allowing the applicant and co-applicant to securely provide asset and income information digitally, without the need for delivering hardcopies, emails or faxes of bank statements and paychecks. Click Here to review the Finicity workflow training guide that shows applicant/co-applicant interaction.
Available Finicity products are:- Verification of Income
- Verification of Assets
- Verification of Income and Assets
Additionally, we are working with Finicity to provide access to their combined VOIE product through EPN. We will keep you posted as this product becomes available.
Getting StartedIf you have clients interested in utilizing the EPN-Finicity integration, you can get started today by following the steps below. |
|
Step 1: Experian Codes
Contact your Experian bureau representative to get codes for Finicity products. Codes will be assigned on a per-lender basis. Lender codes can be pushed down to all branches. Codes are good for offering all 3 products listed above. |
|
Step 2: EPN Vendor Setup
Contact Josh Zinkgraf to enable the Finicity vendor and products for your manager account in EPN. |
|
Step 3: Setup Codes, Products & Pricing
Once your manager account is enabled, you can login and begin entering the codes that are assigned to the lender, setting up branches, enabling products, and entering pricing.- Click the Client Setup menu at left to find the lender you want to enter codes for.
- Click on the lender’s name to open the lender account.
- Move to the Wrench icon (Vendors screen), then scroll down and find the Available Vendors section.
- Find the VOA section, expand it, and click the green plus sign next to the Finicity system vendor to add Finicity VOA to the Active Vendors list.

- When prompted to enable this vendor on branches, click the Yes button.
- On the Associated Branches page, click the Edit Associated Branches button, then either select All (for this vendor and products to be available to all branches), or Restricted, then select the branches this vendor and product list should be available for, and Save.
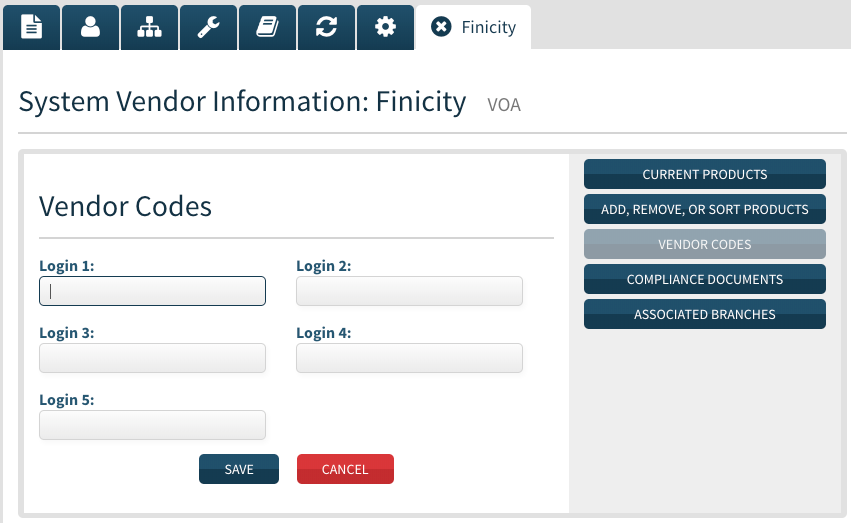
 - Click the Vendor Codes button, then click the Edit Vendor Codes button. Enter the Finicity codes you were given by Experian for the VOA product into the corresponding fields. Save your changes.

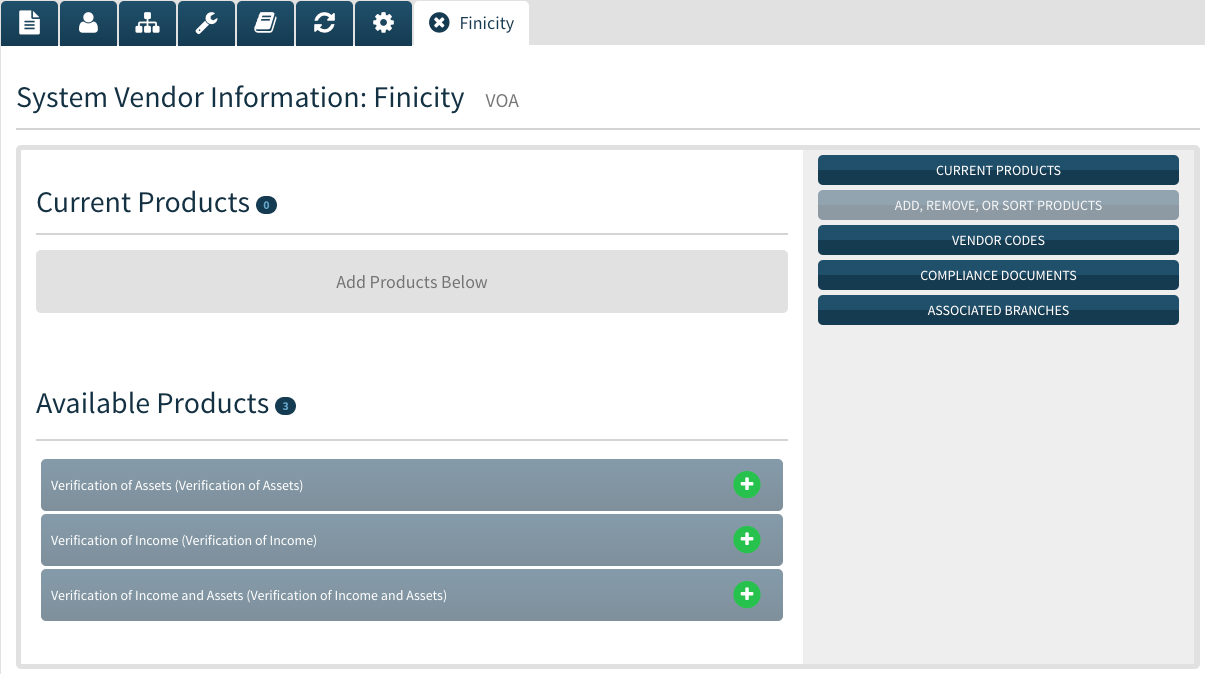
- Click the Add, Remove, or Sort Products button. In the Available Products section, click the green plus signs for each product to make these products available for this vendor.

- Click the Current Products button. On the Products page, click the Edit button on each product to add a Price, then Save your changes.

A Note on Branch-Level Product and Pricing Customizations: The setup process outlined here is for making all products available to all branches at the same price under this lender. You can customize what products are available to branches and change pricing at the branch level if you choose.
|
|
Did you find it helpful?
Yes
No
Send feedback Sorry we couldn't be helpful. Help us improve this article with your feedback.


