Appraisal Firewall Release Scheduled for
Friday Morning, November 19th, 2021
Release Information for Managers
Starting Friday morning, November 19th, 2021, a new version of Appraisal Firewall will be available for you, your clients, and your appraisers.
This release marks our most comprehensive enhancements for all of 2021! Included in this system update are the inclusion of the party responsible for payment remittance on the Billing Details tab, a new Appraiser Groups report, relaxed restrictions on Canned Messaging for internal communication, and numerous updates to the appraiser My Profile screen. We have added considerable customization tools to assist in streamlining the appraisal process so you can manage and track all your appraisal orders easier than ever before! Complete information on all enhancements can be found below.
Please refer to our Knowledge Base for more extensive training materials.
New Enhancements for Managers, Lenders, and AppraisersAt-a-Glance Information: Party Remitting Payment to the Appraiser
Confusion can occur regarding who the party responsible for remitting payment to the appraiser should be, often resulting in multiple inquiries between you, your client, and the appraiser. We have added the party responsible for paying the appraiser directly on the Billing Details tab to significantly decrease payment inquiries for all parties involved. Additionally, we have included a second line-item stating if the appraiser is responsible for paying any accumulated service/billing fees. With these enhancements, appraisers and lenders alike will quickly be able to deduce where payment will be coming from and if the appraiser is responsible to pay any assessed fees.
How To Use This Feature:
Open any order and select the Billing Details tab ($ icon). Located near the bottom of the screen is where the party responsible for payment will be listed. Should the appraiser be responsible for paying any service/billing fees, this will be listed directly under the party payment remittance line. Please note only service/billing fees the appraiser is responsible for paying will be listed.
 |
|
New Enhancements for Managers and LendersInvestor Field Added to Dashboard Options
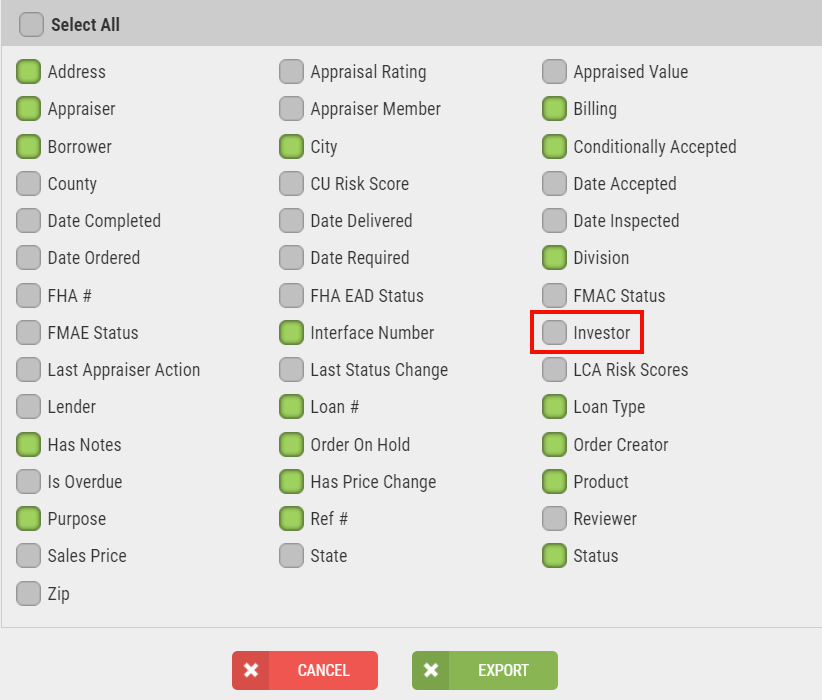
Investor is now an available field within the column chooser customization tool, bypassing the need to access the property information to view the name of the Investor. When Investor is added to your dashboard, you will see Investor as the column header, where the Investor name will be visible. By including Investor to the dashboard, we have also included Investor as a field within the Export All feature.
How To Use This Feature:
From the dashboard view, select the arrow on the right.

An overlay will appear listing all available fields and all current fields. Investor will be listed under Available Fields.

To add Investor to the dashboard, drag Investor from the Available Fields list to the Current Fields list, and select Commit. Investor will be added as a column on the dashboard. Through the addition of adding Investor as an available dashboard option, Investor has also been added to the Export All feature. Select the Export All button on your dashboard.

An overlay will display a variety of options to generate on the report. Any items that are currently on your dashboard will automatically be enabled. If Investor is not currently on your dashboard, you can enable Investor for the purpose of the report while not adding Investor as an available column on your dashboard.

Select Export to generate the report. |
|
New Appraiser Groups Management Reports
To assist with evolving lender panels, an all-new Appraiser Groups report has been added to the generic canned reporting section. This report will list those members that have been added to existing appraiser groups on your clients’ active appraiser panels. Such additions made during the selected timeframe allow you or your clients to make the necessary adjustments to the Manage Appraisers portion of a division’s settings, ensuring an up-to-date roster.
How To Use This Feature:
Select the Reporting option from the main dashboard. Towards the bottom of the Standard Reports section is the newly added Appraiser Groups report. Expand the report to set a date range, send the report via email, or setup this report to run automatically.

By default, the date range will reflect the last 30 days. Once the desired date range is in place, select Run Report. A .CSV file will be generated for your review. The report will display any appraiser members that have been added to an existing appraiser group associated with your clients’ panels in the specified timeframe. Within the contents of the report are the appraiser group administrator’s name, names of the recently added appraiser members, date the members were created, and the division(s) the members are associated. |
|
Internal Messaging Permitted With Canned Messaging Restrictions
Approximately a year ago, we introduced the ability for you to create Canned Messaging for your clients to limit what kind of messages managed users could send to appraisers. This assisted in quicker responses to inquiries while remaining in a fully compliant and contained environment. A review of the overall Canned Messaging process can be found HERE. When Canned Messaging restrictions are in place, managed users can now communicate internally with their teams without the need to go outside of the system. The message field is open to enter an individually composed message to Originators, Administrators, and/or Customer Service, so users can quickly respond to inquiries as needed, keeping all communication confined within the order. Any messages directed to the appraiser will continue to result in communicating with existing canned messages.
How To Use This Feature:
The key component to this new feature is that Canned Messaging for a lender is in place, and at least one managed user is restricted to only have access to Canned Messages. Users that have the Only Allow Canned Messages restriction in place can open any order from their dashboard. Select the Send Message option to the right. Users with the messaging restriction will see that when they switch the recipient dropdown menu to any user outside of the Appraiser option that the message field will now allow the user to enter a custom message.

Selecting Administrators, Originators, or Customer Service will change the messaging field from a light gray color to white, indicating that a custom message can be composed and sent to the intended recipient.

Once the message is sent, the custom created message will be posted on the Communication Log as with any other messaging type. |
|
Require Estimated Value/Sales Price Division Setting
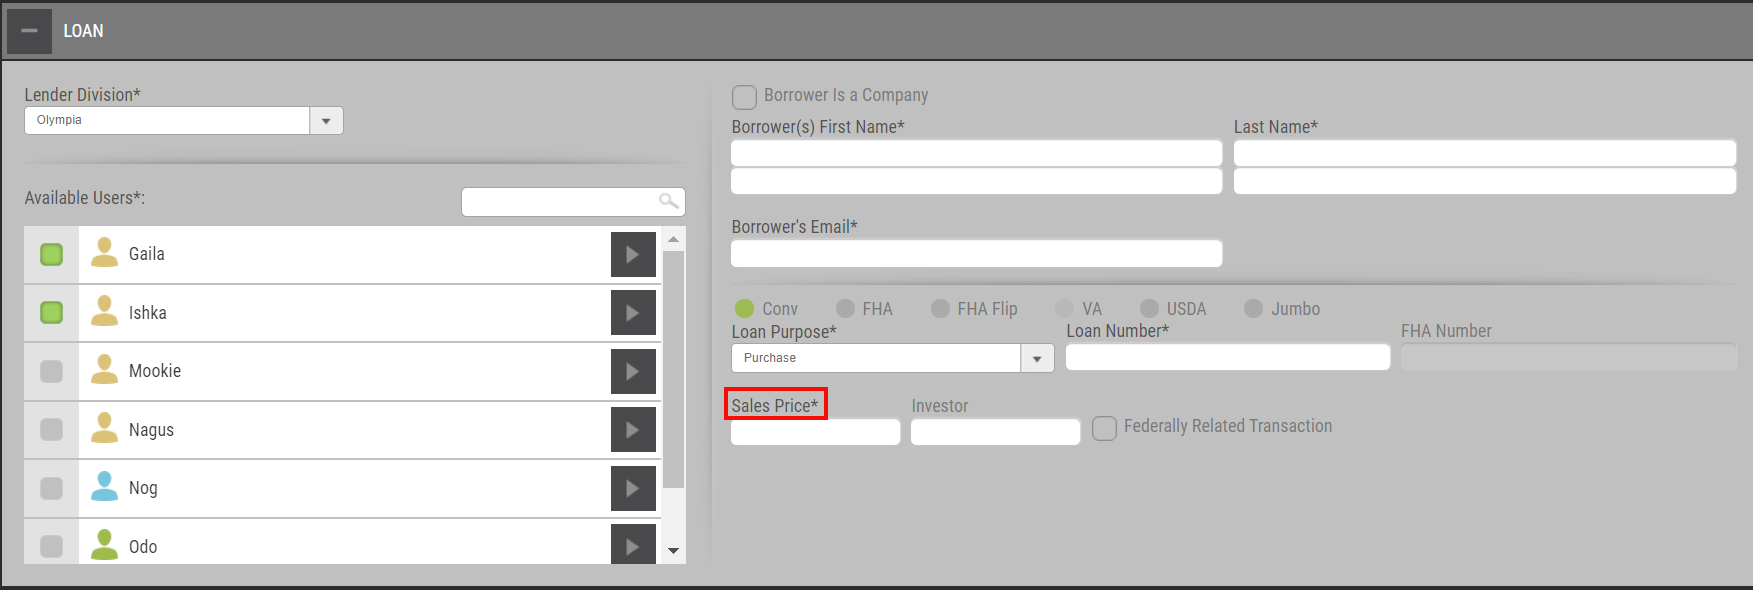
To help with faster appraiser acceptance and more timely delivered reports, we are pleased to include Require Estimated Value/Sales Price as an optional divisional setting. Once this setting is enabled, processors will be required to enter the Sales Price on Purchases or Estimated Value on Refinances to have the new order placed successfully.
How To Use This Feature:
From the Relationships menu option, select the client you want to enable this setting via the Lenders tab. Expand the client and select Manage Divisions.

Select the division to enable this new setting. Choose Edit Settings and expand the General section.

Enable the Require Estimated Value/Sales Price checkbox if you would like this setting required on order placement. Once the setting is enabled, be sure to select the SAVE button.
From the New Order screen, choose Residential, as this setting is only applicable to Residential order types. Select the appropriate division. Within the Loan section, there will be an asterisk adjacent to the Estimated Value field for Refinance or an asterisk adjacent to the Sales Price for Purchase. Please note the asterisk designates the field is required.


Once the order has been placed successfully, the Estimated Value or Sales Price will be reflected on the Property Information tab, including the print view option. Please note the Estimated Value will be hidden on the appraiser view, but visible for managed users. |
|
Enhancements for AppraisersAdditional Billing Address to Send Payments
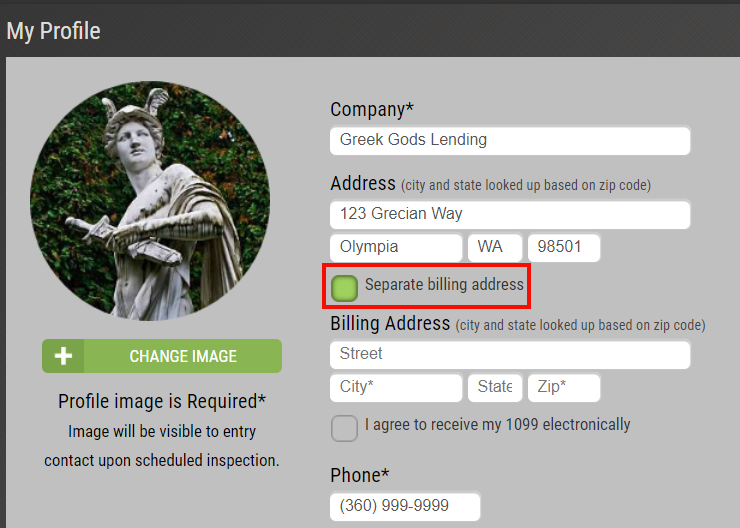
Payments mailed out to appraisers are based on the address the appraiser has entered on their profile, which typically is the appraiser’s office location. With payment cycles sporadically falling towards the end of the week, weekend, or occasional holidays, the check can remain at the appraisal office for several days. To mitigate payment delays for appraisers, we have added a new section within My Profile, called Separate Billing Address, where appraisers can enter the address they wish all payments to be sent.
How To Use This Feature:
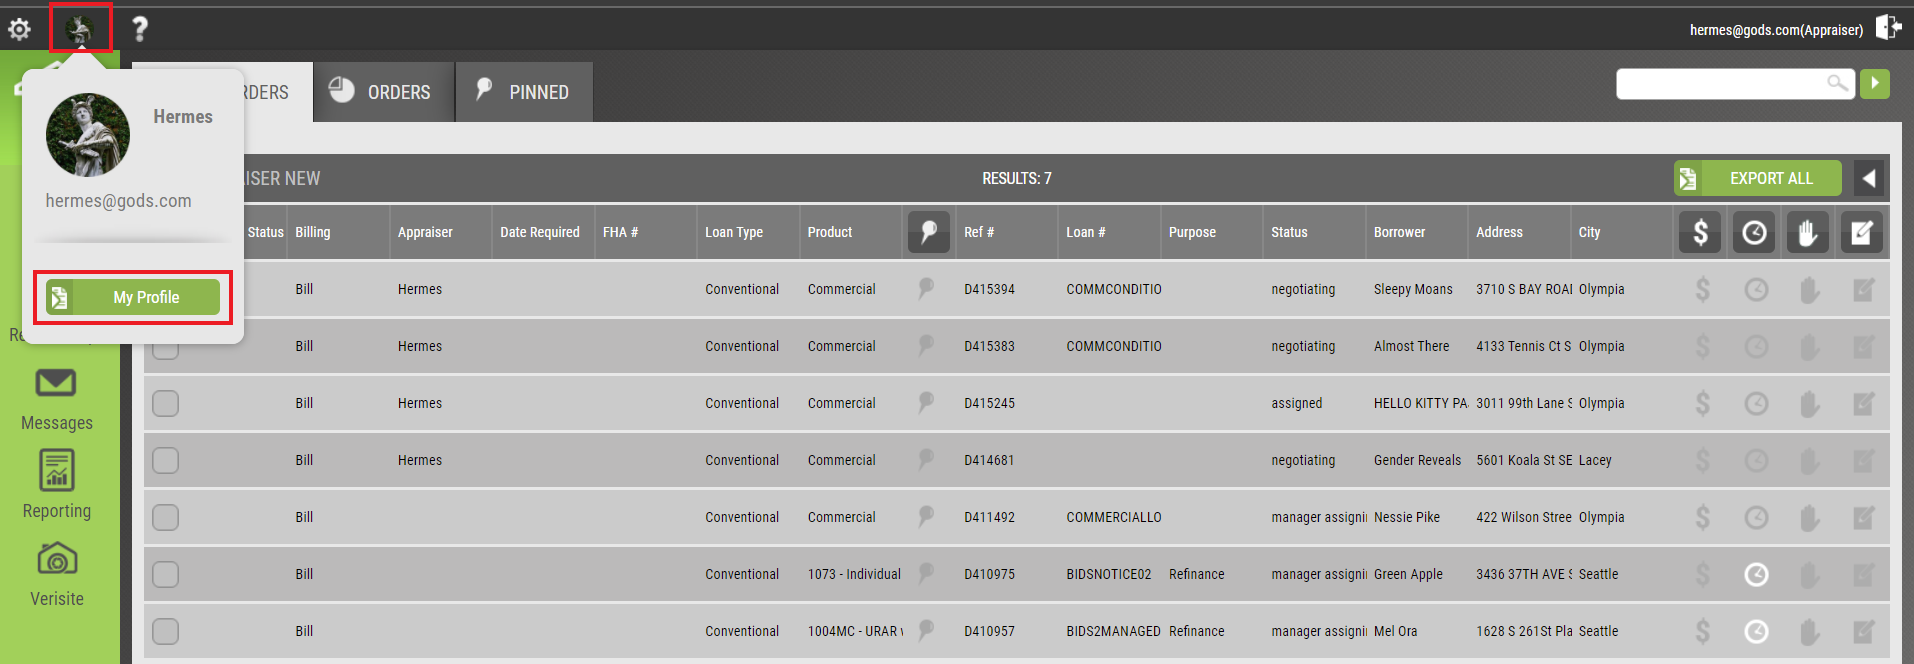
After an appraiser accesses their account, select the Profile Icon in the top left, between the gear icon and the question mark. Select My Profile.

The My Profile screen will have a new box under the entered profile address. Enable the box adjacent to Separate billing address to enter the address the appraiser wants payments to be mailed. Fill out the street, city, state, and zip code under Separate billing address and click SAVE at the bottom to retain the changes.

Payment cycles occurring after the Billing Address has been entered in the system will be sent to the new Billing Address moving forward. Please note that if an appraiser does not wish to enter a Separate billing address, payments will continue to be delivered to the address entered on the appraiser’s profile. |
|
Change ‘Pay To’ Name Printed on Checks
Payments to appraisers have traditionally listed the Company Name as the ‘Pay To’ name on checks. Occasionally this causes an issue with banks or credit unions when an appraiser is depositing the payment. We are excited to announce that appraisers can enter the name they want to have printed on the checks! This new feature will aid in less problematic endorsement issues when making a deposit and ensuring the appropriate name is listed on the check.
How To Use This Feature:
Login to an appraiser account, select the Profile Icon in the top left, between the gear icon and the question mark. Select My Profile.

The My Profile screen will have a new field located under the Contact field titled Print Name On Check. Enter the name that should be printed on the check and select SAVE at the bottom left.

Please note that once the Printed Name On Check field has been entered, all subsequent payment cycle checks will reflect this change. Additionally, if this field is left blank, checks will continue to have the company name displayed on the ‘Pay To’ portion of the check. |
|


